GRAPHIC DESIGN
LEVEL ONE
The Pen Tool.
I will never ever lie to you and in keeping things very honest, this tool is NOT easy to learn. It is not what you are used to at all so you will need to listen carefully and watch the demonstrations before you attempt to use the tool, if you want to minimize your frustration. These tutorials are here to assist you on your journey of Pen Tool Mastery and yes, it CAN be done!
Pen Tool Basics: READ ME FIRST!
With the help of the Pen Tool (P) you can create straight and curved segments, and also three types of anchor points: smooth point, corner point and points with retracted handles. Let’s see how to do it. To create a Straight-line segment take the Pen Tool (P) and simply click at the beginning and the end of the segment that is being created.

To create a Curved segment click at the place of the first point and, without releasing the mouse button, drag the cursor to the side, creating point’s handle.
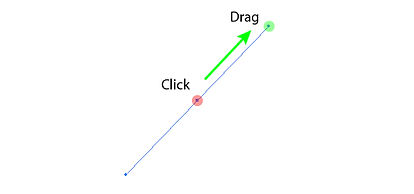
Now click at the new location, and again pull the cursor to the side.

You can combine linear segment with a curved one using the technique described above.

A point that has two related handles is called a Smooth point. That means when changing the angle of inclination of the first handle, the second one will change the inclination angle as well.

ASSIGNMENTS
If you need to review the information we have viewed in class, you will need headphones for these videos. Please do not play them without headphones.
Video 1: Pen Tool Basics
Video 2: Curved Lines with the Pen Tool
Video 3: OOPS! Help, I Deselected!
Video 4: How to Trace the Doggie
Assignment: Download the Doggie & Trace!
Tutorial: How to use Layers in Illustrator
Assignment: Download your choice of TWO and trace using the pen tool:
Here is the information on your learning goals and the state standards:
Content Standard 3.0: Demonstrate Knowledge of the Key Aspects of Production Using Industry Standard Software
Industry Standard Software being learned is Adobe Illustrator and a Key Aspect of this software is knowing how to use the Pen Tool.
Direct Selection Tool (A) is designated to change the position of the point, the length and inclination angle of the handle.

In order to break the connection between the handles of the point we will need the Convert Anchor Point Tool (Shift + C). It is located in the same group with the Pen Tool (P) on the Toolbar.

Change the inclination angle of one of the handles using this tool. As you can see, the handles are no longer connected and this point is a Corner point now.

To get the point with retracted handles, we just need to do a single click using the Pen Tool (P).
Easily Work With the Pen Tool
From all the above mentioned it is clear that we need three tools to create and modify the path. These are the Pen Tool (P), Direct Selection Tool (A) and Convert Anchor Point Tool (Shift + C). The letters in parentheses after the name of the tool correspond to the shortcuts which activate it. However, in the process of work it is more convenient to use other keys to switch between the tools. Choose the Direct Selection Tool (A) before the start creating the path, then take the Pen Tool (P) and create an arbitrary segment.


Now, if you press and hold Command / Ctrl, then the Direct Selection Tool (A) gets activated, and you can edit the created path.

Command / Ctrl button activates the last chosen selection tool, therefore, before the creation of the path we have chosen the Direct Selection Tool (A). To activate the Convert Anchor Point Tool hold down the Option / Alt key.

Sometimes you need to move the last created point of the path in the process of its creation. If you have not released the mouse button after the last click, then press and hold the space bar, then drag the point to the right place.

If holding down Shift key in the process of creating straight segments, then they will be placed at the constrain angles (0, 45, 90 and 135 degrees).

This feature also works when creating handles of the points.

Pen Tool (P) also has two modes that are activated automatically. Thus, if you hover the tool pointer closer to the path’s segment, the symbol that appears next to it will be + (plus). This mode allows you add a new point.

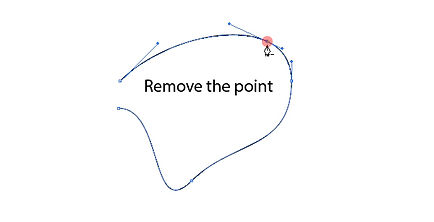
If you move the tool pointer at the point, the symbol that appears next to it will be – (minus). This mode allows us to remove the selected point.
To close the path, simply move the tool pointer to the starting point of the path and click on it. If you exactly combined the pointer with a point, then the symbol that appears next to it will be “o”.
